Accelerating with Hyper-V
 Your computer must be updated
to Windows 10 April 2018 update (build 1803) or later. You can verify that your Windows version is up-to-date
by using the following
steps:
Your computer must be updated
to Windows 10 April 2018 update (build 1803) or later. You can verify that your Windows version is up-to-date
by using the following
steps:
1.
Enter About in the Windows
search box.
2.
Select About your PC in the search results.
3.
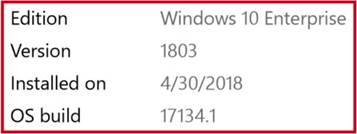
Scroll down in the About dialog to the Windows specifications section.
4.
Verify that the Version is at least 1803:
1.
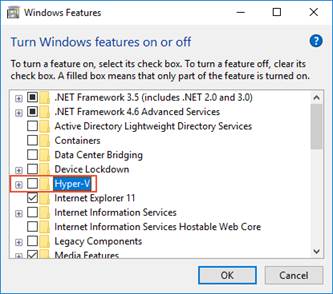
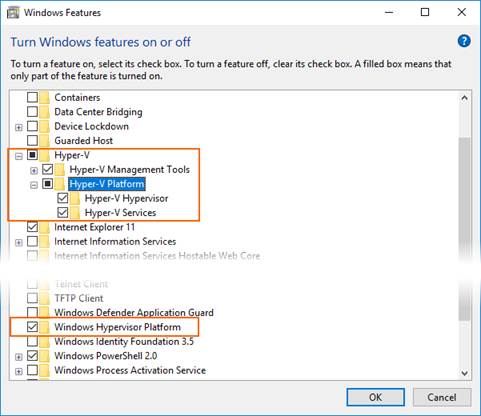
Enter windows features in the
Windows search box and select Turn Windows features
on or off in the search results. In the Windows Features dialog, enable both Hyper-V and Windows Hypervisor
Platform :
After making these
changes, reboot your computer.

Android Device Manager on
Windows
How to use the Android Device Manager to create, duplicate, customize, and launch Android virtual
devices.
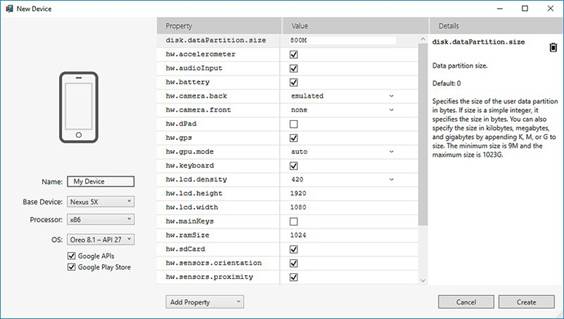
Clicking New launches the New Device screen:

This article explains
how to use the Android
Device Manager to edit the profile properties of an Android virtual device.
Android Device Manager on
Windows
The Android Device Manager
supports the editing
of individual Android
virtual device profile properties. The New Device and Device Edit screens list
the properties of the virtual device in the first column, with the corresponding values of each property in the second
column (as seen in this example):

Deployment issues on Windows
Some error messages may be displayed by the emulator
when you deploy your app. The most common errors and solutions
are explained here.
Deployment errors
If you see an error about
a failure to install the APK on the emulator
or a failure to run the Android
Debug Bridge (adb),
verify that the Android SDK can connect
to your emulator. To verify emulator connectivity, use the
following steps:
1.
Launch the emulator from the Android Device Manager (select your virtual device and click Star t).
2.
Open a command
prompt and go to the folder where adb is installed. If the Android SDK is installed at its default location, adb is located
at C:\Program Files (x86)\Android\android-sdk\platform-
tools\adb.exe;
if not, modify this path for the location of the Android SDK on your computer.
3.
Type the following command:
4.
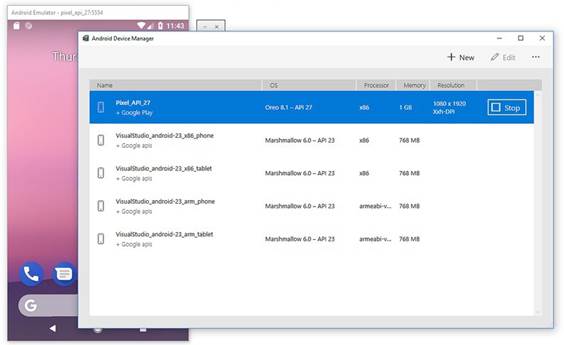
If the emulator is accessible from the Android
SDK, the emulator
should appear in the list of attached devices.
For example:
5.
If the emulator does not appear in this list, start the Android SDK Manager , apply all updates, then try launching the emulator again.
MMIO access error
If the message An MMIO access
error has occurred is displayed, restart the emulator.
Missing Google Play Services
If the virtual
device you are running in the emulator
does not have Google Play Services or Google Play Store installed, this condition is often caused by creating a virtual device without
including these packages.
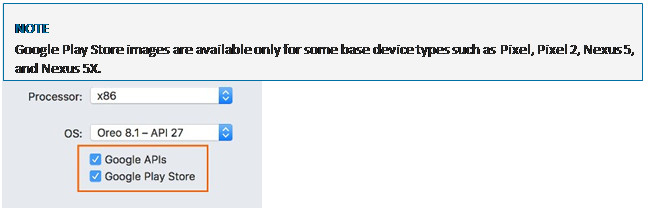
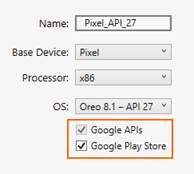
When you create a virtual device (see Managing Virtual Devices with the Android Device Manager), be sure to select one or both of the following
options:

 Google
APIs –
includes Google Play Services
in the virtual device. Google Play Store – includes Google Play Store in the virtual device.
Google
APIs –
includes Google Play Services
in the virtual device. Google Play Store – includes Google Play Store in the virtual device.
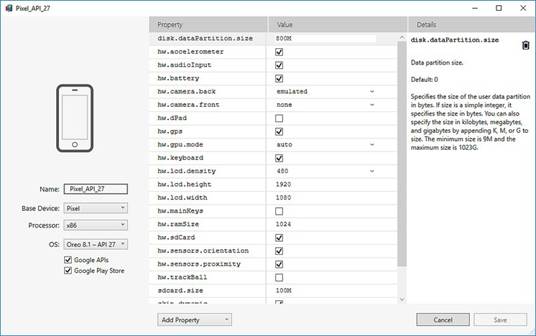
For example, this virtual device will include Google Play Services
and Google Play Store:
Performance issues
 Performance issues are typically caused by one of the following problems:
The emulator is running without
hardware acceleration.
Performance issues are typically caused by one of the following problems:
The emulator is running without
hardware acceleration.
 The virtual device running in the emulator
is not using an x86-based
system image.
The virtual device running in the emulator
is not using an x86-based
system image.
The following
sections cover these scenarios in more detail.
Hardware acceleration is not enabled
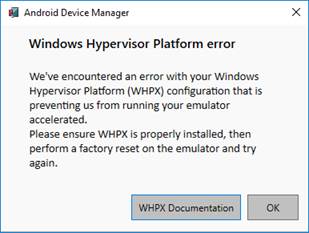
If hardware acceleration is not enabled,
starting a virtual device from the Device Manager will produce a dialog with an error message indicating that the Windows Hypervisor Platform (WHPX) is not configured properly:
If this error message is displayed,
see Hardware acceleration issues below for steps you can take to verify and enable hardware
acceleration.
Acceleration is enabled but the emulator
runs too slowly
A common cause for this problem
is not using an x86-based
image in your virtual device (AVD).
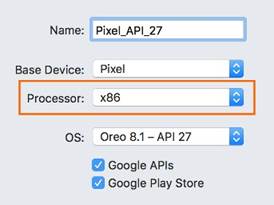
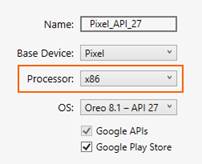
When you create a virtual device (see Managing Virtual Devices with the Android
Device Manager), be sure to select an x86-based
system image:
Hardware acceleration issues
Whether you are using Hyper-V or HAXM for hardware
acceleration, you may run into configuration problems
or conflicts with other software
on your computer. You can verify that hardware acceleration is enabled (and which
acceleration method the emulator is using) by
opening a command prompt and entering the following command:
This command assumes
that the Android SDK is installed at the default location of C:\Program Files
(x86)\Android\android-sdk; if not, modify the above path for the location of the Android
SDK on your computer.
Hardware acceleration not available
If Hyper-V is available,
a message like the following
example will be returned from the emulator-check.exe accel command:
If HAXM is available, a message like the following
example will be returned:
If hardware acceleration is not available, a message like the following
example will be displayed (the emulator looks for HAXM if it is unable
to find Hyper-V):
If hardware acceleration is not available, see Accelerating with Hyper-V to learn how to enable hardware
acceleration on your computer.
Incorrect BIOS settings
If the BIOS has not been configured
properly to support hardware acceleration, a message similar to the following example
will be displayed when you run the emulator-check.exe accel command:
To correct
this problem, reboot
into your computer's BIOS and enable the following
options:

 Virtualization Technology (may have a different label depending on motherboard manufacturer). Hardware Enforced Data Execution Prevention.
If hardware acceleration is enabled and the
BIOS is configured properly, the emulator should run successfully with hardware acceleration. However,
problems may still result due to issues that are specific to Hyper-V and HAXM, as explained
next.
Hyper-V issues
In some cases, enabling both Hyper-V and Windows Hypervisor Platform
in the Turn Windows
features on or off dialog may not properly
enable Hyper-V. To verify that Hyper-V is enabled, use the following steps:
1.
Enter powershell in the Windows
search box.
2.
Right-click Windows PowerShell
in the search results and select Run as administrator .
3.
In the PowerShell console,
enter the following command:
If Hyper-V is not enabled,
a message similar to the following example will be displayed to indicate that the state
of Hyper-V is Disabled:
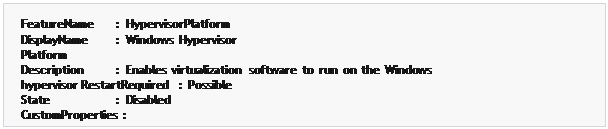
4.
In the PowerShell console,
enter the following command:
If the Hypervisor
is not enabled, a message similar to the following
example will be displayed to indicate that the state of HypervisorPlatform is Disabled:
If Hyper-V and/or HypervisorPlatform are not enabled,
use the following PowerShell commands
to enable them:
After these commands complete,
reboot.
For more information about enabling Hyper-V
(including techniques for enabling Hyper-V
using the Deployment Image Servicing and Management tool),
see Install Hyper-V.
HAXM issues
HAXM issues are often the result
of conflicts with other virtualization technologies, incorrect
settings, or an out- of-date
HAXM driver.
HAXM process is not running
If HAXM is installed, you can verify that the HAXM process is running
by opening a command prompt and entering
the following command:
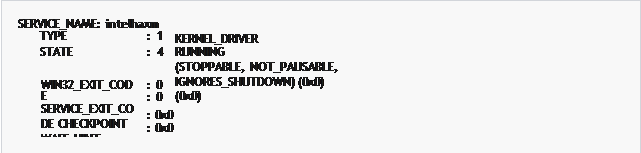
If the HAXM process is running,
you should see output similar to the following result:
HAXM virtualization conflicts
HAXM can conflict
with other technologies that use virtualization, such as Hyper-V,
Windows Device Guard, and some antivirus software:
 Hyper-V
– If you are using a version of Windows before the Windows 10 April 2018 update (build 1803) and
Hyper-V is enabled, follow the steps in Disabling Hyper-V so that HAXM can be enabled.
Hyper-V
– If you are using a version of Windows before the Windows 10 April 2018 update (build 1803) and
Hyper-V is enabled, follow the steps in Disabling Hyper-V so that HAXM can be enabled.
 Device Guard – Device Guard and Credential Guard can prevent Hyper-V from being disabled
on Windows machines.
To disable Device Guard and Credential Guard, see Disabling Device Guard.
Device Guard – Device Guard and Credential Guard can prevent Hyper-V from being disabled
on Windows machines.
To disable Device Guard and Credential Guard, see Disabling Device Guard.
 Antivirus Software – If you are running antivirus software
that uses hardware-assisted virtualization (such as Avast), disable or uninstall this software,
reboot, and retry the Android
emulator.
Antivirus Software – If you are running antivirus software
that uses hardware-assisted virtualization (such as Avast), disable or uninstall this software,
reboot, and retry the Android
emulator.
Incorrect BIOS settings
If you are using HAXM on a Windows PC, HAXM will not work unless virtualization technology (Intel VT-x) is enabled in the BIOS. If VT-x is disabled, you will get an error similar to the following
when you attempt to start the Android
Emulator:
This computer
meets the requirements for HAXM, but Intel Vir
tualization Technology (VT-x)
is not turned on.
To correct this error, boot the computer
into the BIOS, enable both VT-x and SLAT (Second-Level Address Translation), then restart the computer back into Windows.
Disabling Hyper-V
If
you are using a version of Windows before the Windows 10 April 2018 Update (build 1803) and
Hyper- V is enabled, you must disable
Hyper-V and reboot your computer
to install and use HAXM. If you are using
Windows 10 April 2018 Update (build 1803) or later, Android
Emulator version 27.2.7 or later can use Hyper-V (instead
of HAXM) for hardware
acceleration, so it is not necessary to disable Hyper-V.
You can disable Hyper-V from the Control Panel by following
these steps:
1.
Enter windows features
in the Windows
search box and select Turn Windows features on or off in the search results.
2.
Uncheck Hyper-V:
3.
Restart the computer.
Alternately, you can use the following
PowerShell command to disable the Hyper-V Hypervisor:
Intel HAXM and Microsoft Hyper-V
cannot both be active at the same time. Unfortunately, there is
no way to switch between Hyper-V and HAXM without restarting your computer.
In some cases, using the above steps will not
succeed in disabling Hyper-V if Device Guard and Credential Guard are enabled. If you are unable to disable
Hyper-V (or it seems to be disabled but HAXM installation still fails), use the steps in the next section to disable
Device Guard and Credential Guard.
Disabling Device Guard
Device Guard and Credential Guard can prevent
Hyper-V from being disabled on Windows machines. This situation is often a problem for domain-joined machines that are
configured and controlled by an owning organization. On Windows 10, use the following steps to see if Device Guard is running:
1.
Enter System info in the Windows search box and select
System Information in the search results.
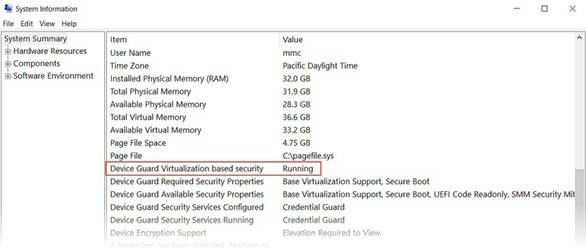
2.
In the System Summary ,
look to see if Device Guard Vir tualization based security
is present and is in the Running state:
If Device Guard is enabled, use the following steps to disable it:
1.
Ensure that Hyper-V is
disabled (under Turn Windows Features on or off) as described in the previous section.
2.
In the Windows Search Box, enter gpedit.msc
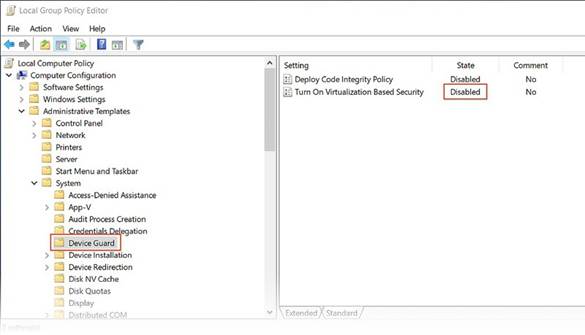
and select the Edit group policy search result. These steps launch the Local Group Policy Editor .
3.
In the Local Group Policy Editor , navigate to Computer Configuration > Administrative Templates > System > Device Guard:
4.
Change Turn On Vir
tualization Based Security
to Disabled (as shown above) and exit the Local Group Policy Editor .
5.
In the Windows Search Box, enter cmd. When Command Prompt appears in the search results,
right- click Command Prompt and select
Run as Administrator .
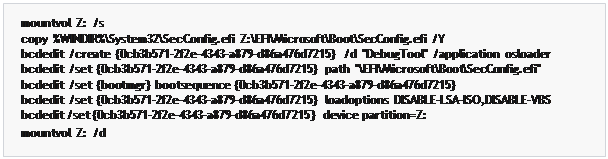
6.
Copy and paste the following commands
into the command
prompt window (if drive
Z: is in use, pick an unused drive letter to use instead):
7.
Restart your computer. On the boot screen, you should see a prompt similar to the following
message: Do you want to disable Credential
Guard?
Press the indicated key to disable
Credential Guard as prompted.
8.
After the computer reboots, check again to ensure that
Hyper-V is disabled (as described in the previous steps).
If Hyper-V is still not disabled, the policies of your domain-joined computer may prevent
you from disabling
Device Guard or Credential Guard. In this case, you can request an exemption
from your domain administrator to allow you to opt out
of Credential Guard. Alternately,
you can use a computer
that is not domain-joined if you must use HAXM.
Additional troubleshooting tips
The following
suggestions are often helpful in diagnosing Android emulator issues.
Starting the emulator from the command
line
If the emulator is not already running, you can start it from the command line (rather than from within Visual Studio)
to view its output. Typically, Android emulator AVD images are stored at
the following location (replace
username with your Windows user name):
C:\Users\username\.android\avd
You can launch the emulator
with an AVD image from this location
by passing in the folder name of the AVD. For example,
this command launches
an AVD named Pixel_API_27 :
This example assumes that the Android SDK is installed
at the default location of C:\Program Files
(x86)\Android\android-sdk; if not, modify the above path for the location of the Android
SDK on your computer.
When you run this command,
it will produce many lines of output
while the emulator starts up. In particular, lines such as the following
example will be printed if hardware acceleration is enabled and working properly
(in this example,
HAXM is used for hardware
acceleration):
Viewing Device Manager logs
Often you can diagnose emulator
problems by viewing the Device Manager logs. These logs are written
to the following location:
C:\Users\username\AppData\Local\Xamarin\Logs\16.0
You can view each DeviceManager.log file
by using a text editor such as Notepad. The following example
log entry indicates that HAXM was not found
on the computer:
MMIO access error
If An MMIO access
error has occurred
is displayed, restart the emulator.
Missing Google Play Services
If the virtual device you are running in the
emulator does not have Google Play Services or Google Play Store installed, this condition is usually
caused by creating a virtual device without including these packages. When you create a virtual device (see Managing Virtual Devices with the Android Device Manager), be sure to select one or both
of the following:

 Google APIs –
includes Google Play Services in the virtual device. Google Play Store – includes
Google Play Store in the virtual device.
Google APIs –
includes Google Play Services in the virtual device. Google Play Store – includes
Google Play Store in the virtual device.
For example, this virtual device will include Google Play Services and Google Play Store:
Performance issues
Performance issues are typically caused by one of the following problems:
The emulator is running without
hardware acceleration.
The virtual device running in the emulator
is not using an x86-based
system image.
The following sections cover these scenarios in more detail.
Hardware acceleration is not enabled
If hardware acceleration is not enabled, a dialog may pop
up with a message such as device will run unaccelerated when you deploy your app to the
Android emulator. If you are not
certain whether hardware
acceleration is enabled
on your computer (or you would like to know which technology is providing the acceleration), see Hardware
acceleration issues below for steps you can take to verify and enable hardware acceleration.
Acceleration is enabled but the emulator
runs too slowly
A common cause for this problem is not using an x86-based
image in your virtual device. When you create
virtual device (see Managing Virtual Devices
with the Android Device Manager), be sure to select an x86-based system image:
Hardware acceleration issues
Whether you are using the Hypervisor Framework
or HAXM for hardware acceleration of the emulator,
you may run into problems
caused by installation issues or an out-of-date version
of macOS. The following sections
can help you resolve this issue.
Hypervisor Framework issues
If you are using
macOS 10.10 or later on a newer Mac, the Android
emulator will automatically use the Hypervisor Framework
for hardware acceleration. However, some older Macs or Macs running
a version of macOS earlier than 10.10 may not provide Hypervisor Framework support.
To determine whether or not your Mac supports the Hypervisor Framework, open a Terminal and enter the following command:
If your Mac supports
the Hypervisor Framework, the above command will return the following
result:
If the Hypervisor
Framework is not available on your Mac, you can follow the steps in Accelerating with HAXM to use HAXM for acceleration instead.
HAXM issues
If the Android Emulator does not start properly,
this problem is often caused by problems
with HAXM. HAXM issues are
often the result of conflicts with other virtualization technologies, incorrect settings, or an out-of-date HAXM driver. Try reinstalling the HAXM driver, using the
steps detailed in Installing HAXM.
Additional troubleshooting tips
The following
suggestions are often helpful in diagnosing Android emulator issues.
Starting the emulator from the command
line
If the emulator is not already running, you can start it from the command line (rather than from within Visual Studio for Mac) to view its output. Typically, Android emulator AVD images are stored at the
following location:
~/.android/avd
You can launch the emulator
with an AVD image from this location
by passing in the folder name of the AVD. For example,
this command launches
an AVD named Pixel_2_API_28 :
If the Android SDK is installed at its default location, the emulator is located
in the
~/Librar
y/Developer/Xamarin/android-sdk-macosx/emulator directory;
if not, modify this path for the location of the Android
SDK on your Mac.
When you run this command,
it will produce many lines of output
while the emulator starts up. In particular, lines such as the following
example will be printed if hardware acceleration is enabled and working properly
(in this example,
Hypervisor Framework is used for hardware
acceleration):
Viewing Device Manager logs
Often you can diagnose emulator
problems by viewing the Device Manager logs. These logs are written
to the following location:
~/Librar y/Logs/XamarinDeviceManager
You can view each Android Devices.log
file by double-clicking it to open it in the Console app. The following example
log entry indicates
that HAXM was not found:

How to setup an Android
device and connect it to a computer
so that the device may be used to run and debug
Xamarin.Android applications.
After testing on an Android emulator,
you will want to see and test your apps running on an Android device. You will need to enable
debugging and connect the device to the computer.
Each of these steps will be covered in more detail in the sections below.
Enable Debugging on the Device
A device must be enabled for debugging in order to
test an Android application. Developer options on Android have been hidden by default since version
4.2, and enabling them can vary based on the Android version.
Android 9.0+
For Android
9.0 and higher, debugging is enabled by following these steps:
1.
Go to the Settings screen.
2.
Select About Phone .
3.
Tap Build Number 7 times until You are now a developer! is visible.
Android 8.0 and Android
8.1
1.
Go to the Settings screen.
2.
Select System .
3.
Select About Phone
4.
Tap Build Number 7 times until You are now a developer! is visible.
Android 7.1 and lower
1.
Go to the Settings screen.
2.
Select About Phone.
3.
Tap Build Number 7 times until You are now a developer! is visible.
Verify that USB debugging is enabled
After enabling
developer mode on your device, you must ensure that USB debugging
is enabled on the device. This also varies based on the Android version.
Android 9.0+
Navigate to Settings > System > Advanced > Developer
Options and enable USB Debugging.
Android 8.0 and Android
8.1
Navigate to Settings > System > Developer Options
and enable USB Debugging.
Android 7.1 and lower
Navigate to Settings > Developer
Options and enable USB Debugging.
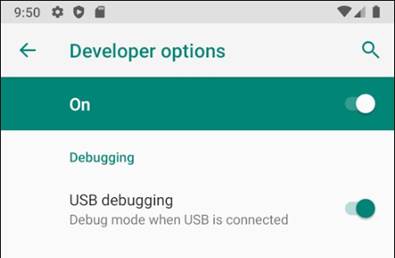
Once
the Developer Options
tab is available
under Settings > System , open it to reveal developer
settings:
This is the place to enable developer options such as USB debugging
and stay awake mode.
Connect the device to
the computer
The
final step is to connect the device
to the computer. The easiest and most reliable way is to do so over USB.
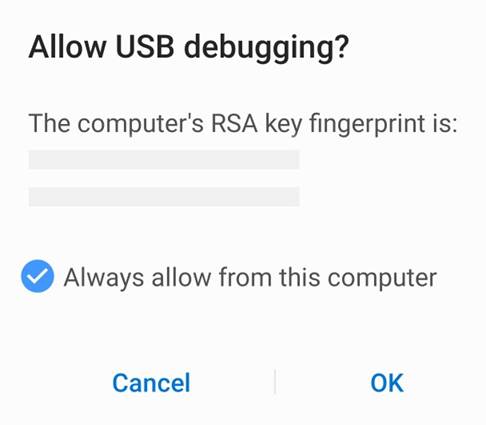
You will receive a prompt to trust the
computer on your device if you have not used it for debugging before. You can also check Always allow from this computer to prevent
requiring this prompt each time you connect the device.
Alternate connection via Wifi
It is possible
to connect an Android device to a computer without using a USB cable, over WiFi. This technique
requires more effort but could be useful when the device is too far from the computer to remain constantly plugged-in via cable.
Connecting over WiFi
By default, the Android Debug Bridge (ADB) is configured to communicate with an Android device via USB. It is possible
to reconfigure it to use TCP/IP instead
of USB. To do this, both the device and the computer must be on the same WiFi network.
To setup your environment to debug over WiFi complete
the following steps from the command line:
1.
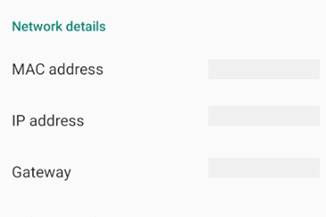
Determine the IP address of your Android device. One way to find out the IP address is to look under
Settings >
Network & internet
> Wi-Fi, then tap on the WiFi network that the device is connected
to, and then tap on Advanced. This will open a dropdown
showing information about the network
connection, similar to what is seen in the screenshot below:
On some versions of Android the IP address won't be listed there but can be found instead under Settings > About phone > Status
.
2.
Connect your Android device to your computer via USB.
3.
Next, restart ADB so that it using TCP on port 5555. From a command prompt, type the following
command:
After this command is
issued, your computer will not be able to
listen to devices that are
connected via USB.
4.
Disconnect the USB cable connecting your device to your computer.
5.
Configure ADB so that it will connect to your Android device on the port that was specified in step 1 above:
Once this command finishes
the Android device is connected
to the computer via WiFi.
When you're finished
debugging via WiFi, it's possible
to reset ADB back to USB mode with the following command:

It's possible
to request ADB to list the devices that are connected to the computer. Regardless of how the devices are connected,
you can issue the following
command at the command prompt to see what is connected:
Troubleshooting
In some cases you might find
that your device cannot connect to the computer. In this case you may want
to verify that USB drivers
are installed.
Install USB Drivers
This step is not necessary for macOS; just connect
the device to the Mac with a USB cable.
It may be necessary to install some extra drivers before a Windows computer
will recognize an Android device connected by USB.
Run
the android.bat
application in the [Android SDK install path]\tools directory. By default, the Xamarin.Android installer will put the Android SDK in following location
on a Windows computer:
Download the USB
Drivers
Google Nexus devices (with the exception of the Galaxy Nexus) require the Google USB Driver.
The driver for the Galaxy Nexus is distributed by Samsung. All other Android devices should use the USB driver from their respective manufacturer.
Install the Google USB Driver package
by starting the Android SDK Manager, and expanding the Extras folder, as can be seen in the follow
screenshot:
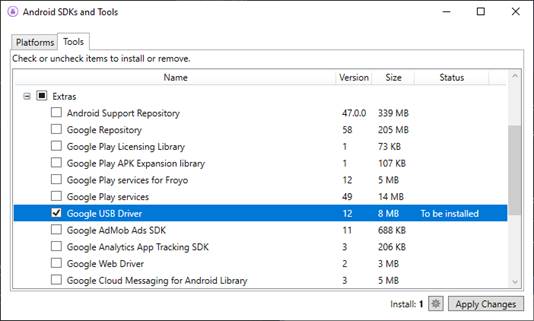
Check
the Google USB Driver box,
and click the Apply Changes button. The driver files are downloaded
to the following location:
The
default path for a Xamarin.Android
installation is:
Installing the
USB Driver
After the USB drivers are
downloaded, it is necessary to install them. To install the
drivers on Windows 7:
1.
Connect your device to the computer
with a USB cable.
2.
Right-click on the Computer
from your desktop
or Windows Explorer,
and select Manage .
3.
Select Devices in the left
pane.
4.
Locate and expand Other Devices in the right pane.
5.
Right-click the device name and select Update Driver Software
. This will launch the Hardware Update Wizard.
6.
Select Browse my computer
for driver software
and click Next .
7.
Click Browse and locate the USB driver folder (the Google USB driver is located in [Android SDK install path]\extras\google\usb_driver ).
8.
Click Next to install the driver.

This guide
describes the steps for switching
to an internal distribution of OpenJDK. This distribution is intended
for mobile development.
Overview
Beginning with Visual Studio 15.9 and Visual Studio for Mac 7.7, Visual Studio Tools for Xamarin has moved from Oracle’s
JDK to a lightweight version of the OpenJDK that is intended
solely for Android
development. This is a required migration
as Oracle is ending support for commercial
distribution of JDK 8 in 2019, and JDK 8 is a required dependency for all Android
development.
The benefits
of this move are:

 You will always have an OpenJDK version that works for Android development. Downloading Oracle's JDK 9 or greater won’t affect the development experience. Reduced download
size and footprint.
You will always have an OpenJDK version that works for Android development. Downloading Oracle's JDK 9 or greater won’t affect the development experience. Reduced download
size and footprint.
 No more issues with 3rd party servers and installers.
If you’d like to move to the improved experience sooner, builds of the Microsoft Mobile OpenJDK distribution are available for you to test
on both Windows and Mac. The setup process is described
below, and you can revert back to the Oracle
JDK at any time.
Download
The mobile OpenJDK distribution is automatically installed
for you if you select the Android SDK
packages in the Visual Studio installer on Windows.
On Mac, the mobile OpenJDK will be installed for you as part of the Android workload for new installs.
For existing Visual Studio for Mac users, you
will be prompted to install it as part of your update. The IDE will prompt
you to move to the new JDK, and will switch to using
it at the next restart.
Troubleshooting
If you encounter
issues with the setup on Mac
or Windows, you can take the
following steps for manual setup: Check if OpenJDK
is installed on the
machine in the correct location:

 Mac – $HOME/Library/Developer/Xamarin/jdk/microsoft_dist_openjdk_1.8.0.x Windows – C:\Program Files\Android\jdk\microsoft_dist_openjdk_1.8.0.x
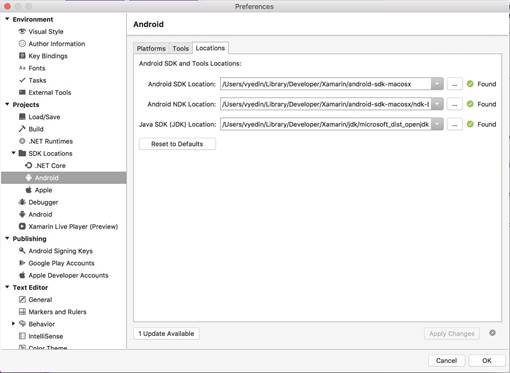
Point the IDE to the new JDK:
Mac – Click Tools > SDK Manager
> Locations and change the Java SDK (JDK) Location
to the full path of the
OpenJDK installation. In the
following example, this path is set to
$HOME/Library/Developer/Xamarin/jdk/microsoft_dist_openjdk_1.8.0.9 but your version may be newer.
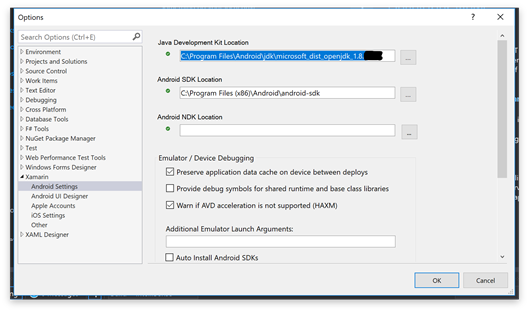
 Windows – Click Tools > Options
> Xamarin > Android Settings and change the Java Development Kit Location
to the full path of the OpenJDK installation. In the following example, this path is set
to
Windows – Click Tools > Options
> Xamarin > Android Settings and change the Java Development Kit Location
to the full path of the OpenJDK installation. In the following example, this path is set
to
C:\Program Files\Android\jdk\microsoft_dist_openjdk_1.8.0.9 , but your version may be newer:
Known Issues
Package 'OpenJDKV1.RegKey,version=1.8.0.25,chip=x64' failed
to install
This may be an issue in some corporate environments. OpenJDK is already
on the machine - follow the troubleshooting steps above to point your IDE to the correct location.


![مربع نص: Component Intel x86 Emulator Accelerator (HAXM installer) r6.2.1 [Extra: (Intel Corporation)] not present on the system](M1Sec02.files/image057.png)